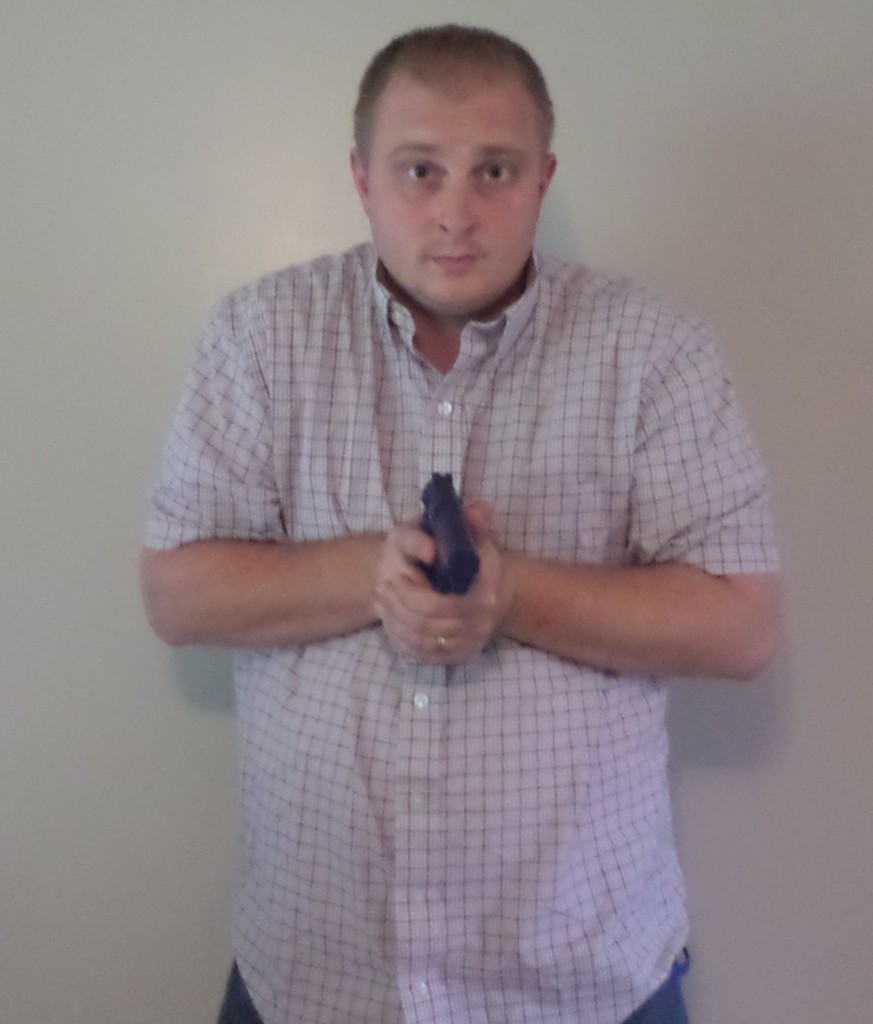
Chest ready position is achieved by simply bringing the gun back to your chest from a firing position. Photo: author
Fatigue
Many armed citizens fail to consider the fatigue their arms will encounter in a ready position. The majority of civilian encounters occur very quickly and do not result in keeping someone held at gunpoint. But after an incident, you may need to do this for a fair amount of time. In most areas, police response time can be over 10 minutes and, although you have stopped the threat, you need to remain ready in the event the threat again presents itself. Remember that your adrenaline will have been pumping during the attack, and in this wait time, you can experience the “crash” that occurs after an adrenaline rush. This will make you feel much weaker and susceptible to fatigue.
A chest ready position allows you to relax your arms and shoulders much more than other positions such as the low ready. In the low ready position, you remain at extension and lower the gun below your line of sight. This results in the weight of the gun being forward of your center of gravity, and you must hold it up with the muscles of your arms and shoulders. Think of holding a five-pound weight in this position. After a short amount of time, your arms and shoulders would begin to feel fatigued. If you took that same five-pound weight and brought it in to your chest, you would be able to hold it for much longer before you felt fatigued. You can try this exercise yourself with just about any heavy object.
Many of the other ready positions have a similar issue. Even with a high ready position, where you hold the gun up near your shoulder, you use muscles that you don’t need to.
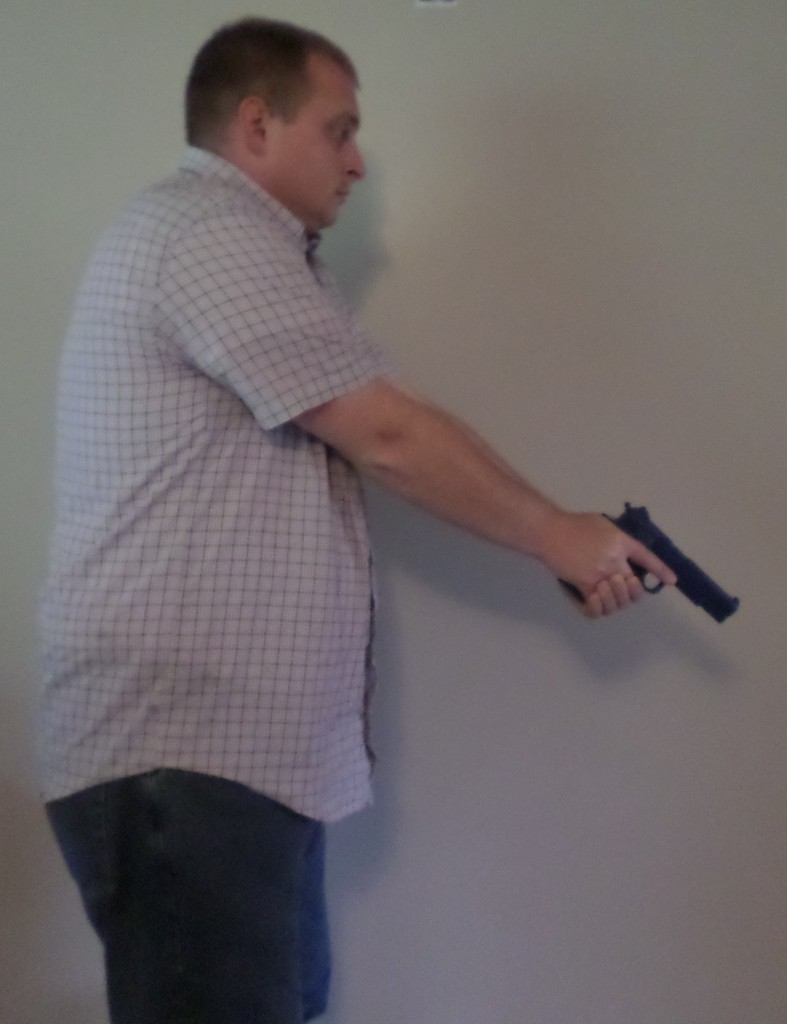
Classic low ready position causes you to need to hold the gun up with your arms. This can result in fatigue over a period of time. Photo: author
Consistency
Bruce Lee once said, “I do not fear the man who has practiced 10,000 kicks once but I fear the man who has practiced one kick 10,000 times.”
This quote relates well to how and what we train in defensive pistol. Having one method that works well with all the other things we must do, such as loading, unloading, malfunction clearing, and presenting from the holster, makes sense. Training other methods and throwing them in as “just another tool in the tool box” makes you take time away from the technique that you are most likely to need or use.
The chest ready position gives us the opportunity to use a ready position that becomes a focal point of our defensive firearms training. In this position, we can complete all the other tasks we may need to do, such as loading, unloading, malfunction clearing, etc. Even further, we can get many more repetitions of the chest ready position by utilizing any time we complete these activities at the range. Positions that we must go away from to complete these tasks do not give the opportunity for extra reps. In a low ready or high ready position, we must move away from them in order to complete these tasks, causing us to lose this consistency and, ultimately, efficiency.
Defendable Position
One major concern of any ready position is how well we can defend ourselves in it. Other ready positions can leave us very vulnerable to being attacked or grabbed from behind. We demonstrate this in class using a few different ready positions in comparison to the chest ready position. From a low ready position, a person coming from behind can easily wrap his arms around you in a bear-hug style grab. It can be very difficult to escape from this and you must also now attempt to keep control of your handgun. The high ready position presents an even bigger problem, because someone approaching from behind can easily grab your gun. Even if you are able to prevent the gun being ripped from your hand, you are in a physical altercation over a gun. This is never a good spot to be in.
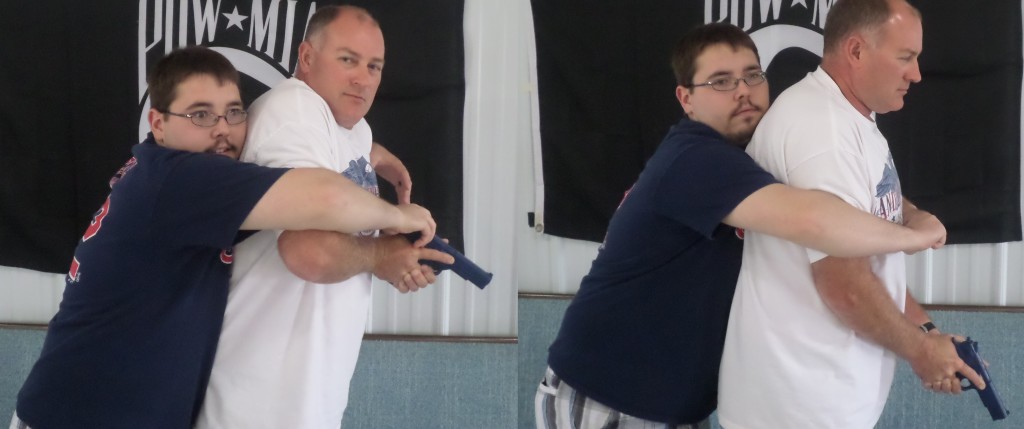
Students demonstrate difference in being able to defend against someone attacking from behind. In the low ready position, a “bear hug” is easily achieved, immobilizing your arms. Photos: author
Attacks from the front can present a problem in low ready or high ready positions. The 21-foot rule is normally applied to shooting from the holster when confronted by someone with a knife or blunt weapon, but really demonstrates how quickly anyone can get to you. Imagine someone running toward you from inside this 21-foot area.
In a low ready position, you would need to raise the firearm to get an effective hit to center mass. As this person is running and then lunging toward you, they are blocking your extended arms from being able to move upward to get this shot. Your best chance becomes firing into the lower body and attempting to keep control of the gun. Again, even worse would be having the pistol in the high ready position and needing to make a downward motion similar to a clichéd knife strike. If the threat gets close enough, you have no shot and are again in a physical fight over your gun.
From the chest ready position, we have more options. We may still end up in contact with the attacker, but we have much better control and the ability to get a center-mass hit to stop the threat. We can even use our support hand to block while placing the pistol in a retention-style position to get this in-contact hit.
Presenting from Ready
Presenting the firearm from the ready position should be as efficient as possible and offer us the best chance of quickly stopping the threat. We also want to ensure we are not harming innocent bystanders. The low ready position must be presented by swinging our already fully extended arms up toward our intended target. This generates inertia — the tendency for an object to resist a change in its path of motion. Simply stated, the gun moving up will continue to move up until it is stopped by our arms.
Students who have attempted this in class tend to miss their shot high out of the accurate area or even the entire silhouette. This is because your arms are moving up quickly and, when you decide to stop, they keep going for a short period of time. The first shot misses, and subsequent shots are made after your brain has had time to tell your arms to correct their position. Using the high ready position can result in the exact opposite, with the first miss being low. To prevent this, I have seen students move very slowly from ready position to give themselves time to stop their hands. This is not efficient.
From the chest ready position, we can quickly punch the gun forward and get our hits efficiently. This is not to say you can move super-fast, as the same principle with inertia applies. If you move too quickly, the gun will jump at the very end of your presentation, causing you to lose accuracy on your first shot. This extension of your arms should be done quickly but smoothly. Still even with this to consider, students get much better results utilizing this presentation. Further to its credit, students are also able to correct this more easily after it has been explained.
Conclusion
Choosing what ready position to utilize for your defensive firearms training tends to be overlooked by many students as well as instructors. People often go by things they see on TV or in movies, which do not represent the reality of defensive shooting. The chest ready position meets all the criteria we need out of a ready position. It is not something that fits one scenario but rather fits the vast majority of our likely worst-case scenarios. Stay consistent in your training and utilize this position every time you use a pistol.
Share tips, start a discussion or ask one of our experts or other students a question.
Already a member? Sign in
27 Responses to “Chest Ready Position”

Very good lesson
I was taught the Chest Ready position in my basic CCW class with Dave Franceway and it was also reiterated at class I took at the Tactical Defense Institute, so this is not new to me, though reading this gave me more reasons that make it preferable to other ready positions, and also other things to consider in its use. Such as, in the Chest ready position, if attacked again, a person could shoot with pistol still in that position if necessary. Its not much different than the another 'emergency shot' which is part of the Ohio Peace Officers qualification, I learned at TDI. In that scenario, the attacker is just a couple feet from you, you draw your pistol and press the side of your hand and pistol against the lateral side of your chest, (this is just above the holster midway between armpit and waist), the pistol is slightly tilted away from you torso and you fire 2 rounds. In this case the target is arms distance from you. Qualification is the 2 rounds center mass in the chest. Good article, which is why subscribe to your newsletter.
Good advice from all and good discussion. Next time though, please refrain from using abbreviations and technical terms without explaination as not everyone are familiar with them, especially the less experienced shooters like me. Thanks, Guys.
like to use chest ready, crime show show arms extended bad idea if you get to corner and someone grabs the gun or your extended arms
Further comment, I remember at police academy, I shot a 12 gauge from the hip, held under my arm. The sight pattern was the barrel in my periferal vision. Three shot at 50 feet, the center mass was no longer. I line pistols by visual of the barrel and sights and at 7 yards this works well with center mass hits.
Thanks, I like this. Being older(past 80) I realize my reactions are slower. I have seen a presentation of shooting from the chest in close combat. his works well from "the chest ready position",
Be very careful about using chest ready. Even though I prefer it, we have to remember that we must consider what witnesses may see in the differences in chest ready and low ready. If they say you were pointing your weapon at the subject with chest ready, many state laws may allow prosecutors to charge you for aggravated assault even though you were in the defense, whereas low ready (pointing at ground at 45 degrees) would be more defensible in court. LEO's however would be well advised to use chest ready at all times, especially because of the ambush attacks being committed against our friends in blue!
I teach the high ready position as part of the NRA Personal Protection curriculum. The best way to teach this position is to have the student clap their hands and see where they come together. This is the work area where all firearm manipulations (firearm ready position, scanning, reload, malfunction clearing, etc.) take place.
I think this is unsafe and unnecessary. Low ready works just fine if you rest your arms on your torso. In the 'bear hug' photos, I see no difference in the portion of the arms being 'hugged', which means there's as much freedom of movement with the low ready as with the less safe 'chest ready' position. This is an "innovation" we don't need.
Your "ready position" will be dictated completely by your environment and the threats contained therein. If you are in your home and are clearing your stairwell, your ready position may be up or down, depending on your stairwell's direction. If you are clearing your hallway, you may be in a one-hand retention position while your other hand holds a flashlight or turns a door knob. It's fine to have a favorite but it's more important to teach your students all of the ready positions so they will be prepared for any situation. Just my opinion and I enjoyed your article!