In this multi-part series of articles/tutorials, I am going to demonstrate the various malfunctions on the AR-15 weapon platform. It is important to note that the skills outlined are applicable across a broad spectrum of weapons. It is my hope that the student or instructor reading this will gain a better understanding of how to:
- 1. Recognize, diagnose and fix the six malfunctions outlined here in both light and low/no-light situations.
- 2. Safely set up the malfunctions outlined for personal at-home training and on the range during formal classes.
- 3. Perform immediate action on the more common, simple malfunctions shown.
- 4. Perform remedial action on the less common, complex malfunctions shown.
- 5. Gain a better overall understanding of this weapon platform and the skills necessary to refunction the system in an efficient, combative and retainable manner.
- Whenever conducting any firearms-related training, it is important to review and follow the four firearm safety rules:
- 1. Treat all guns as if they are loaded at all times.
- 2. Never let the muzzle cover anything you are not willing to kill, destroy or purchase.
- 3. Keep your finger off the trigger until your sights are on the target and you have made the conscious decision to fire.
- 4. Know your target and the environment around it, to include its background, what’s to each side, and its foreground.
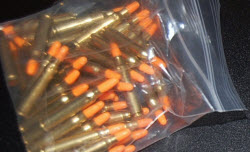
Verify NO live rounds have been mistakenly stored with your dummy rounds.
www.personaldefensenetwork.comCarbine Malfunction Diagnostic Procedures
The majority of carbine malfunction diagnostic procedures are based solely upon visual inspection of the chamber. While this seems like common sense, it is important to note that a majority of confrontations occur during low-light hours. Other procedures rely upon hearing what the carbine does or doesn’t do. When attempting to fire the very first round, the carbine operator may hear a click, not the bang that was expected.
However, it is also important to note that if the gunfight is in progress and shots have been fired, there is a strong probability that nothing will be heard due to body alarm reaction and the effects of adrenaline stress such as auditory exclusion. Because of these factors, a more comprehensive, sensory-based approach to malfunction diagnosis is necessary.
This methodology is based upon knowing the weapon system by kinesthetic feel via the trigger finger as your primary diagnostic indicator first and reliance upon visual and auditory input for support or as confirmation second. Brian Hartman of Progressive F.O.R.C.E. Concepts in Nevada introduced me to this methodology in 2004 and I have been teaching it for six years with excellent results. Within a few hundred rounds of shooting, it is possible for most shooters to recognize, feel and understand when the bolt carrier locks to the rear or does not return to battery. The gun tells us what it is doing without our having to observe it.
The trigger also provides us with valuable information about the condition of the carbine. You don’t see what the trigger does and you may not always hear what it does, but you will feel what it does. For malfunction diagnostic purposes, feeling what the trigger does indicates whether immediate or remedial action is necessary. Feeling the trigger “click” is the primary indicator that immediate action is needed. When the trigger does not click but only moves slightly through its range of travel (what we call a “mushy” trigger), this is the indicator that remedial action is needed.
This tactile, sensory-based procedure works in broad daylight and in low/no light. Visual confirmation is secondary in the process, providing the operator with information as to the extent of the remedial action necessary. While this methodology runs contrary to what the U.S. Military and other training organizations recommend, it has been my experience teaching hundreds of civilian students that this method is easy to learn, retain and utilize under stress.
Training on this diagnostic SOP is conducted via dry fire practice and, more effectively, live fire, which forces students to actually attempt to fire the weapon in order to diagnose the problem. The operator cannot simply run up on a gun during a drill, pick it up, peek into the chamber and run through a refunction procedure. In a real combative situation, you will be attempting to fire the weapon or had been firing the weapon when it goes down. Training should replicate this fact.
Generalized Malfunction Clearance Guidelines
- The following generalized guidelines have been proven through training to support fast, efficient and retainable malfunction clearance application under stress:
- Move by getting offline or to cover/concealment while communicating with teammates, partners or family members.
- Bring carbine into natural workspace to perform all combative gun-handling or manipulations.
- Aggressively handle the carbine at all times—attempt to rip the charging handle off the carbine when racking, and release the charging handle as opposed to riding it forward.
- Avoid breaking the final firing grip when manipulating the charging handle, unless absolutely necessary or during remediation of a complex malfunction.
- Breathe and slow down. Taking a little time at the beginning could save you a lot of time at the end. Just because you can do something fast does not mean you’re doing it right.
- CLICK means TAP, MUSH means RIP!
Training Tip
During complex malfunction clearance (Remedial Action Drill), transferring the carbine into the support-side shoulder (for a right-handed operator) is recommended. This has proven to provide the operator with better visualization of the ejection port and the ability to utilize the dominant hand during remediation. In timed complex malfunction remediation drills, operators following this method are as fast as and usually faster than operators retaining the carbine in their right shoulder.
Combative Gun-Handling Positions
When performing any combative gun handling or manipulation, follow the fundamental concept of head up, eyes up and gun up. If you choose to keep the carbine mounted in your shoulder, be cognizant that with most of these malfunctions, you are attempting to clear spent casings and debris from the firearm. Therefore it is imperative that you roll the carbine outboard in an attempt to face the ejection port toward the ground, which will allow gravity to aid in clearing any obstructions.
A major concern with the S.P.O.R.T.S. (Slap, Pull, Observe, Release, Tap, and Squeeze) malfunction clearance procedure is that, when attempting to observe, the right-handed operator rolls the carbine inboard to get a better visual since the ejection port is on the right side of the carbine. This very often causes the spent casing to roll back into the chamber instead of falling out as desired, thereby creating a more severe malfunction.

High Control Position
- Carbine is taken out of shoulder mount, rolled outboard until port faces ground, lip of magazine well can be visualized and stock is indexed under arm as high as physically possible.
- Head is up in attempt to maintain visual on target and/or environment.
- Better control of carbine for individuals of smaller stature or strength.
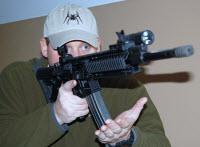
Shoulder Mount Position
- Carbine stays in shoulder mount in attempt to maintain visual on target and/or environment.
- Roll carbine outboard as much as possible, ejection port toward ground.
- Can be problematic for individuals of smaller stature or strength.
- This position makes it more difficult to visualize magazine well. During TAP, RACK this may not be an issue, but during any other magazine manipulation, it proves to be problematic. Consequently this position will be demonstrated but is NOT RECOMMENDED.
Charging Handle Manipulation Methods
For the purposes of this tutorial, it is important to demonstrate the various charging handle manipulation methods. Individuals and various training schools have their preferred method. Pick one that works for you and train it. Whichever method you do utilize, follow these guidelines:
Keep finger OFF the trigger during charging handle manipulation.
Strong hand does not leave fire control. Support hand manipulates charging handle. Negligent discharges have occurred when the operator manipulates the charging handle utilizing the strong hand and hastily goes to reacquire a firing grip on a now cocked, loaded rifle with the selector set on fire! This is not recommended.
Utilizing support hand for charging handle manipulation is supportive of handgun manipulation procedures.
Location of rear sight on top rail can have a direct effect on charging handle manipulation.
Location of sling attachments and slings can have a direct effect on charging handle manipulation.
Three common methods, in order of preference:
1. Edge of Hand
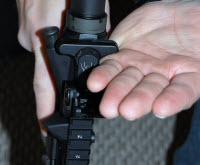
- Hook meat of palm on charging handle. Depress release and pull rearward. Release handle.
- Attempt is made to rip charging handle off rifle.
- May put lateral stress on charging handle.
- Can be problematic on charging handles without tactical latch.
- Only works for right-handed shooters without ambidextrous latch.
2. Pinch
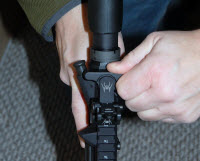
- Pinch release on charging handle. Depress release and pull rearward. Release handle.
- Attempt is made to rip charging handle off rifle.
- Can be problematic on charging handles without tactical latch.
- Relies on only two digits.
- Only works for right-handed shooters without ambidextrous latch.
3. Claw
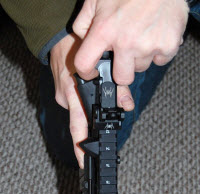
- Hook both sides of charging handle. Depress release and pull rearward. Release handle.
- Attempt is made to rip charging handle off rifle.
- Works from either side of weapon platform.
- Right-handed operators tend to cant weapon system inboard, which may add to or create a more severe malfunction.
- Some shooters have tendency to break final firing grip and use strong hand with this method. NOT RECOMMENDED.
What do you think so far? We’re just getting started! In the next installment, I’ll examine the common carbine malfunctions and refunction procedures in detail.

Good info. I use the "Claw" method with my left hand. I'm a right-handed shooter. This method has never failed me.
I like it. Bump and rack!!! Well written, easy to understand verbiage, structured well for beginner or experienced shooters. Especially appreciate your preference/recommendation with regard to variance in technique. Thanks...
Because I reload my 6.8 spc, I have found that most of my problems come from rushing the reloading process. If the brass is not fitting into your bullet gauge, it will certainly jam in your rifle. Not as many problems with factory ammo, but it doesn't hurt to inspect it before putting it into the magazine. Also, it helps to keep that BCG well oiled. If you haven't fired your gun in 6 months, strip it and lube it again. You should get into a normal routine of doing that every so often anyway. Oil is your friend. I am also left handed and my firearms eject that way.
I appreciate this information...thank you!!
For us geezers, on charging handle, consider claw technique using ring & long finger of non-dominate hand, then pushing out with dominate hand. Ring finger grip much stronger than index finger. And dominate arm usually stronger than non-dominate arm. + the weapon will not cant nearly as much. At least it works for me.
Will study am still in basics of building weapon
Like this very much
Good info. Looking forward to the next segment.
Regarding the Tree Common Methods (Edge of hand, Pinch and Claw), sometimes when the charging handle was release and in process for loading/chambering and locking, the bolt carrier not properly lock, and will be cauce failure to firing. It is 'full release' or 'release and support' the charging handle?.
Need more explanation on S.P.O.R.T.S. What am I suppose to be SLAPPING?