Before I get into techniques and equipment, I want to address the ingredient that ties everything together: training. If you have taken a class from me, or read one of my articles, you know I am adamant about training yourself to success versus allowing yourself to fail. This means that you need to train in low light in order to understand and overcome all the challenges that the situation causes.
Ever tried this handheld lighting technique?
www.personaldefensenetwork.comThis article will be broken down into simple, usable bits of information that I have found to be relevant in the many low-light scenarios and classes I have experienced. My goals are to:
- - Help you select a good light, or assess if the one you have will do the job.
- - Show the pros and cons of weapon-mounted lights.
- - Present a handheld lighting technique that is simple to use and applicable in the close-range attacks you might encounter.
- - Examine whether or not night sights are critical in a low-light environment.
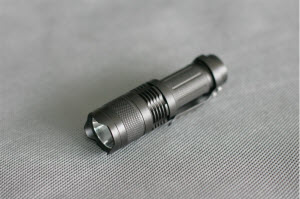
The Nitecore Extreme is a small and lightweight flashlight that has 220 lumens of output.
www.personaldefensenetwork.comLight Selection
Defending yourself in the dark is difficult, but it’s obviously much more difficult if you don’t have a light. First and foremost, commit to carrying a light everywhere you go. The lights made by reputable manufacturers today are small, lightweight, and very easy to carry. I admit that I like simple things, and therefore my first rule of light selection is to choose a light that works well but does not offer a lot of unnecessary functions. Lights that strobe or do SOS signals as well as different intensity functions are sometimes worth having. But I strongly recommend against buying a light that is so complex you have a hard time figuring out how to use those features, or worse, trouble using the primary feature (bright illumination) when you need it. I have seen more than one student have a strobe or low-intensity “AD” in class and frantically press buttons and turn bezels to fix the problem while the rest of the line was engaging a target.
Get a light with a thumb button activated switch, preferably one with a momentary feature and a permanent reverse click feature so you can click the light on, or just illuminate it for a second.
Make sure the light offers 120 or more lumens. Anything less will have less of an effect on the threat when you place the light in their eyes. Most lights these days have well above that amount.
Choose a waterproof light so you can use it when you need to and it doesn’t fail in the rain. I have washed my Nitecore light three times, and it has survived and continued to work well.
A toothed or serrated bezel is nice to have on a light, but be cautious when traveling. I have had one light taken away because the TSA agent said it was a “striking tool.” Some manufacturers advertise a toothed bezel as a tool that can be used to break out a vehicle windshield. I will say (from experience) that this is easier said than done.
Lastly, try to select a light small enough that you can carry it in your pocket with the bezel down (in the pocket), which means the clip will probably be mounted on the switch end. My personal favorite light is the Nitecore Extreme, which runs on CR123 batteries and has an output of 220 lumens. This is an awesome flashlight, and I have carried and used it for several years.
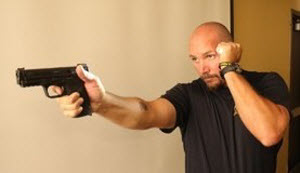
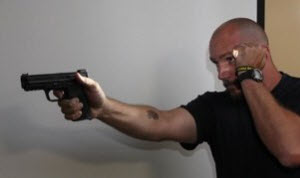
The downside to using a weapon-mounted light is that you may have to point the light, and muzzle, directly at someone to identify what is in their hands.
www.personaldefensenetwork.comPros and Cons of Weapon-Mounted Lights
These days, almost everyone has at least one weapon-mounted light, and they are a great solution for shooting in low-light environments. But although a weapon-mounted light offers advantages when shooting, it has some limitations during searches. The main problem that a weapon-mounted light presents is that the user must point the weapon at anything they want to directly illuminate. While it is possible to “wash” the light (bounce it off an object) off the ground and see most of what is in a room, in order to clearly see what is in someone’s hands, it might be necessary to shine the light’s beam directly at the person.
This means that the barrel of the gun is also pointed at the person. Following good safety principles and ensuring that the finger is off the trigger, and even outside the trigger guard, will help overcome this situation, but you the user must accept the risk that you are pointing your muzzle at a potential non-threat. The only way to really see what someone has in their hands (to make your decision to shoot or not) is to fully illuminate them with the beam.
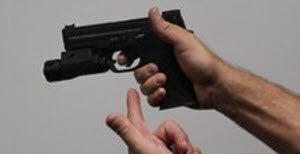
If you use a weapon-mounted light, ensure you get one that offers an activation switch on the handgun grip, so you are able to activate it with one hand.
www.personaldefensenetwork.com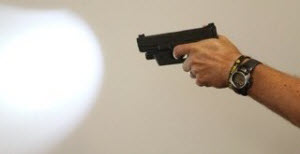
This Crimson Trace light offers a switch that can be easily activated by either hand. Here author has activated it with his support hand.
www.personaldefensenetwork.com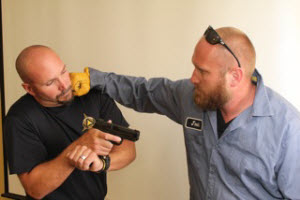
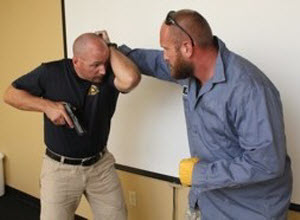
This two-handed technique offers some theoretical stability but allows a potential threat to land a strike with relative ease.
www.personaldefensenetwork.comHandheld Lighting Techniques
Knowing and training to use a handheld light is important for everyone, even those who have a weapon-mounted light, due to the fact that lights fail sometimes and your backup light will probably be a handheld. As a firm believer in simplicity, I recommend you use a flashlight technique that is simple and effective in most circumstances. The method I teach was not invented by me, but modified from an existing platform that I used to teach in the Federal Air Marshal service. The obvious downside is that you will be shooting with one hand, so if your one-handed shooting is subpar, you’ll need to spend time on it. You can practice one-handed drills with a flashlight in your hand even during daylight to get familiar with the technique.
I am familiar with the various two-handed flashlight techniques, and while I think each has its merits, I believe each also has some downsides. The Rogers technique is the only two-handed technique I know of that offers decent recoil control, and it is a modification of the normal shooting grip with the flashlight trapped between the first and second or second and third fingers (depending on who teaches you). The palm of the hand activates the flashlight as the shooter increases the grip pressure on the gun and button on the end cap.
The eye-index technique makes it very easy to defend the head from a potential strike, as well as throw a counterstrike if desired (punch or hammer-fist type strike).
www.personaldefensenetwork.comAnother possible issue with some two-handed techniques is that they could easily cause the user to flag their hand with their muzzle if they had to break the technique apart and get one hand up to protect their head while simultaneously pulling their gun to a retention position.
To summarize: Two-handed techniques may be applicable if the user practices them regularly, but I don’t teach or recommend them, since they offer relatively no recoil control over one-handed shooting, make it much harder to defend your head, and are complex and slower to use when a situation occurs where one has to shoot.
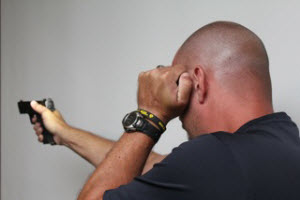
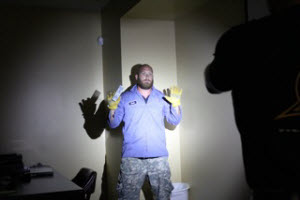
The eye index technique is simple to use, positions the hand in a protected place on the head, and illuminates both the threat and sight very well.
www.personaldefensenetwork.com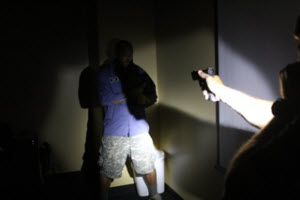
The neck index technique offers some downsides in that the threat is shadowed by the lower light placement, and the gun sights receive little illumination. This technique was modified by simply moving the light up and level with the eye, and it became the eye index technique.
www.personaldefensenetwork.com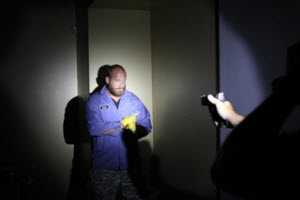
The eye index technique offers great illumination of the threat as well as the sights.
www.personaldefensenetwork.comGrip the flashlight with the thumb on the activation button deep enough in the hand to leave the index finger free to facilitate gun or magazine manipulation.
Flashlight index the gun on the head, no lower than the eye. When done correctly, the sight and target should both be illuminated.
Once you find the right index point and wrist angle, learn what it feels like so you can reindex that point quickly if needed for an engagement. Keep the wrist angle the same once you perfect it, as varying the angle will change where the beam hits the target.
Illuminate by depressing the thumb button on the light, using temporary on to engage, scan and assess. The flashlight need not be indexed to the head when searching, but I recommend keeping it high in case you need to defend your head from a blow.
Try the eye index technique next time you train. I think you will find it useful and simple to learn.
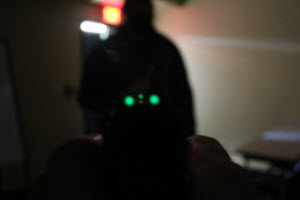
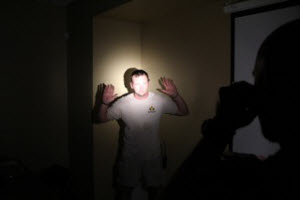
When it’s dark enough to see the night sights, it’s impossible to see what is necessary to make the decision to shoot, because you cannot see what is in the person’s hands or what he is doing.
www.personaldefensenetwork.comNight Sights
I will admit something: You might not find night sights on my carry gun! I know, I am breaking a cardinal rule, right? I am often asked the importance of putting night sights on a carry gun, and my answer is that while they are nice, they are not a “must have.” If money is tight, I would rather you invest in a backup light or weapon-mounted light before night sights.
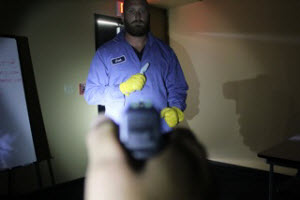
Using the light reveals that the person is not armed with a weapon, but a remote control. Night sights are nice to have, but not needed due to the illumination from the flashlight.
www.personaldefensenetwork.comMy recommendations are to carry a good light and train to use it. If possible, buy a Crimson Trace Lightguard and put it on your gun. Carry a backup light. Put night sights on your gun if you have the cash to spare, but place your emphasis on gear that will help you illuminate the threat and make critical decisions quickly.
With the eye index, or any technique, one of the biggest keys to employing it properly is training.
www.personaldefensenetwork.comConclusions
I hope your biggest takeaway from this article is that low-light training is a must if you want to be prepared to fight in situations where there is little or no light. In order to assess and select the right technique for you and your circumstances, you must constantly experiment with your gear and the techniques you may find useful.
“Mistake of fact” shootings are those where the shooter mistakes a fact and shoots someone because they believe them to be armed. A large percentage of cases where this occurs are due to reduced visual acuity of the threat in low light. Failure to train in the environment will hamper your ability to win the fight.
Now get out there and train!
Share tips, start a discussion or ask other students a question. If you have a question for an expert, please click here.
Already a member?

Great article, to many people think that mounted lights will be the only flashlight that they need on their guns and they are getting in trouble. Training is super important and both handheld and mounted lights have a place, in most cases a handheld light should be used. Thank you for making the gun world a safer place.