Last night, I spent three hours shooting in the dark. The goals: to shoot test my new JP-15LE rifle, test my low-light mounting solution (a SureFire X300 mounted at twelve o’clock on the top rail) and get some trigger time in complete darkness. To say I learned some valuable lessons from conducting this session would be an understatement. I am not new to low-light shooting, and I teach the low-light block with a handgun regularly. I also spend about one night per month shooting with my rifle in low-light conditions, but this particular training session came after a longer break than I like. I believe strongly that regular training is the only way to stay sharp. As an instructor, I am continually evaluating techniques and always attempting to expand my own skills and abilities. I train every week year-round with all three systems I use regularly: the shotgun, rifle, and handgun.
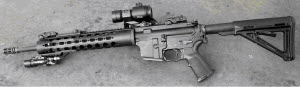
The JP-15LE, a sub-MOA rifle built for the rigors of law enforcement use. A lightweight, extremely accurate rifle capable of shooting as well as most precision rifles.
For this particular session, I shot my JP-15LE, JP Rifles’ law enforcement/military model in their high-performance rifle line. The JP-15LE is designed to be the premium rifle at a lower price point, meaning JP quality at an affordable price. (One unique thing about JP Rifles is that they offer a program where an officer will be sent a loaner gun if he uses his JP in the line of duty and it is confiscated as evidence!) The gun I have is a 16-inch version with pretty much all the stock parts JP puts on the rifle. In addition, I added my SureFire X300 to the top rail, as well as some backup sights, a sling system, and a B.A.D. Lever, all made by Magpul.
You might ask why I mounted the light at twelve o’clock in the first place. There are actually a couple of reasons. First, I don’t like to have gear mounted on my rifle at six o’clock because it forces my hand to be farther back (toward the magazine well) on the gun, causing me to lose real estate in that area. I like to have my support hand as far out as possible when shooting a rifle for increased muzzle control.
Second, I had yet to mount a rail to the bottom of the hand guard on this particular rifle, so I thought I’d test the twelve o’clock position with the SureFire light and simply operate it using my thumb just like I would if the light were on my pistol. This allowed me to skip attaching a pressure activation switch to the light, and it works well when shooting bilaterally (off either shoulder).
Before starting the session, I mounted my light at the twelve o’clock position on the top rail, though I knew that position on a rifle can be problematic due to smoke issues at longer ranges.
Why not mount my light at the three o’clock or nine o’clock positions, or somewhere else on the side? Because the light simply washes back brilliantly when shining it on a wall or the edge of a door when working corners, sending light splashing back into the eyes. The three and nine o’clock positions also force the operator to expose the light, gun and himself more so than a twelve or six o’clock position.
The training session began at 2000 hours, and I spent about three hours testing close-, medium-, and long-range shooting techniques and also worked on using cover by setting up some barricades. Training with this simulated cover was a big part of proper training, as well as testing techniques in the contextual situation they would be used, thus allowing the correct lessons to be learned. I did not exceed 100 yards, as using a light to illuminate and engage past 100 yards would be out of context for me (and most others).
The lessons learned were as follows:
Training Is the Way
One key to an effective training program (as described in my book Your Competition Handgun Training Program) is that training sessions must be done at regular intervals. My failure to train in low light with my rifle absolutely affected my performance, and I felt out of place during the session. I could feel this right away in the activation of the light as well as my manipulation of the rifle system in total darkness. I try to practice what I preach, because the longer-than-normal break I’d taken definitely affected my results here. Easy fix—I will be logging more low-light sessions in the future.
Watch the Splashback!
This session consisted of using some barricades that simulated wall corners or the edge of a piece of cover. Although I spent a portion of the night training in the open just working on illuminating, shooting and scanning the threat area, adding a barricade demonstrated the incredible importance of ensuring that the light did not splash back in my face, blinding me in the process.
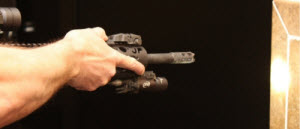
This is what happens when you mount the light and do not allow the beam to miss the wall--serious splashback of the light right into your eyes!
Another observation in relation to that concept is that the shadow caused by the edge of the barricade can easily hide a potential threat downrange. The light must be used in a manner that illuminates what needs to be seen without exposing too much of the rifle and operator, all while paying attention to the potential for splashback. Staying a proper distance from cover is a big part of this lighting equation.
Have a Backup Plan
When I teach low-light shooting with a handgun, I always tell students to carry a backup light. Most rifle shooters have a weapon-mounted light that’s a great piece of gear, but what if it fails? A handheld light is a viable option when your weapon-mounted light goes down, but using such a light is a unique skill that must be learned and trained. Don’t expect to master it in the middle of a fight! During my training session, I bumped the switch on the rear portion of my light, causing it to turn off. When the light failed (due to operator error), I resorted to using my handheld light, a skill that’s tricky with a rifle because you lose the ability to grip the hand guard the same way you normally do.
Test and Modify Your Gear
This was the biggest lesson learned. While I knew that the twelve o’clock mounting position of the light was not the best option, I had convinced myself that at the ranges I would likely operate my rifle, the smoke obscuring my vision would not be an issue. I was wrong! Even at closer ranges of ten yards, the smoke became an issue with multiple rounds fired. And with the light mounted at twelve o’clock, the smoke issue was huge, especially when using an optic (an Aimpoint C3 in this case). Without testing the light in live fire, I would not have realized how much the smoke would obscure my vision.
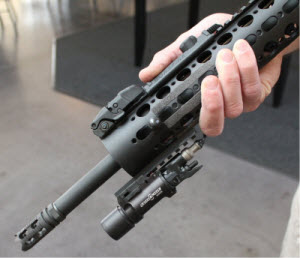
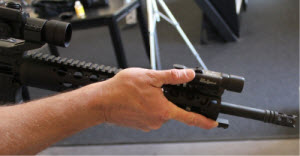
This is where I recommend mounting the light, as opposed to twelve, three, or nine o’clock.
At more than 50 yards, the smoke completely covered the targets and kept me from shooting for a second or so until it cleared enough for me to see the next target. After I mounted the light at the six o’clock position, the smoke problems became almost nonexistent, due to the fact that the light was no longer illuminating the smoke in front of my scope. As stated before, the three and nine o’clock positions are not recommended because of the increase in splashback that the shooter will get from those positions. See the photo (left) for exactly how and where I mounted my light.
In addition, I had a new piece of gear on the rifle that I had not used before, a B.A.D. Lever. Made by Magpul, this is a unique device that allows the operator to lock or release the bolt with the trigger finger of the shooting hand. While the B.A.D. Lever worked great, the user did not! I found myself forgetting to use it and not using it properly.
The point: Train regularly with the gear you have on your gun. If it doesn’t work (as in the case of the twelve o’clock mounting position of my light), then modify it.
In closing, I’ll repeat what I said about training regularly. While I do often train in low light, I had skipped a couple of months. This made me much less comfortable when performing, and having new gear just complicated things. I have to dedicate myself to training regularly in this environment if I want to be able to perform well in it. Also, remember that training is not effective if not designed well and done within the context of the situation where the skill might be needed. Now get your rifle out and train!
Resources

Hi, I desire to subscribe for this blog to get newest updates, therefore where can i do it please assist.
Thank you for every other informative blog. Where else may I get that type of information written in such an ideal way? I've a undertaking that I am simply now operating on, and I have been at the look out for such info.
Have you ever thought about publishing an ebook or guest authoring on other sites? I have a blog based upon on the same information you discuss and would love to have you share some stories/information. I know my viewers would appreciate your work. If you are even remotely interested, feel free to send me an e mail.
I got this web site from my friend who told me concerning this site and at the moment this time I am visiting this website and reading very informative posts at this time.
I'm amazed, I have to admit. Seldom do I encounter a blog that's both equally educative and amusing, and let me tell you, you've hit the nail on the head. The problem is an issue that too few men and women are speaking intelligently about. I am very happy that I stumbled across this during my hunt for something relating to this.
Having hunted hogs in the dark down here in Florida, with multiple guns, with lights mounted at different positions, I can state without even a hint of reservation, that regardless of where you mount your light, you will encounter problems shooting at night, especially with a light. And, the position of the light really doesn't make any difference when you encounter that problem. The problem is not with smoke; given the miracles of modern smokeless powder, it just honestly doesn't smoke a lot, even in the presence of high intensity LED barrel mounted lights. When conditions are right, and the hot gases escaping your barrel run into cool moist to super moist evening air, you will encounter a cloud of fog. You will at times encounter a cloud of fog that rivals the biggest baddest black powder smoke cloud you've ever seen. And, in that circumstance regardless of where you mount your light, there is no second shot. Quite simply, there are nights that I can put 5 rounds through the shotgun, reload and get 2 - 3 more off, without any problem, put 8 - 10 rounds out with the AR, and then there are nights you squeeze the trigger on the first round, with either and you're done. The hogs are gone before the fog clears enough to see anything.
This website definitely has all the information and facts I needed about this subject and didn't know who to ask.
When someone writes an piece of writing he/she retains the image of a user in his/her brain that how a user can understand it. Therefore that's why this post is great. Thanks!
It is not my first time to pay a visit this web page, i am browsing this site dailly and take pleasant facts from here all the time.
Thank you for any other great post. The place else may just anyone get that type of info in such a perfect manner of writing? I've a presentation subsequent week, and I am on the search for such info.